How to Wall Mount a TV on Studs
Locating Your Studs
Welcome back to our DIY project tutorial covering installing a TV wall mount in your kitchen. If your walls are wooden, continue reading about locating wall studs for mounting. Otherwise, skip to the section on stable installation without the assistance of wall studs.
Your best approach here is to make use of a good stud finder to locate the wall studs in your walls. Some will isolate the edges of your stud while others will show its center, so make sure you know what you’re working with. Typically studs should be separated by 16” centers.
If you do not have access to a stud finder or simply want to go about this with some elbow grease, there are a few other workable methods for locating your studs:
- Existing electrical outlets will generally be located alongside studs. Start from the nearest outlet and perform the “knock test” to its left and right; knock on the wall at intervals until you hear a more solid sound than hollow. Drill a small hole to confirm your discovery, then work off of the standard 16” center distance to move towards your desired location.
- In certain cases (such as with plaster walls), a knock test won’t work as they will sound the same no matter what. Popping off your baseboard can show you where your studs are located without having to fill a handful of discrete screw holes in such a scenario.
Now you know where your studs are– but do you know if they are wooden or metal? In order to confirm, you will want to drill a small hole at the center of one and discover its material. If the studs are metal then this process is still doable, but it will demand the right fasteners for the job. This  DIY project tutorial walks through the process for metal stud installation. Additionally, be aware that most cantilevered arms will fail on metal studs– so you will either need to replace the studs in the area with wooden ones or stick to a flush wall mount.
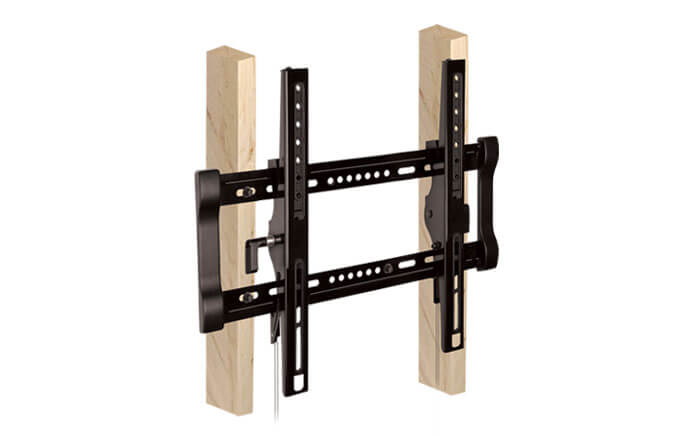
Equipped with the info above, you should now look into the appropriate wall mount based on your TV size, studs, and mobility needs to ensure a good mount. Depending on the size of your television you may want to ensure that you will be mounting on multiple studs for stability and strength.
The wall mount should come with some associated hardware and pieces for the rear of your TV set. Attach these to the TV, then measure from the center of the bracket plate down to the bottom of the TV. Use this measurement to help you determine the best vertical location for your TV to hang on the wall.
Drill your top mount holes into the studs first. Use a level to ensure that the second hole is aligned horizontally (mark with pencil to get the spot right). This step is crucial to avoid a crooked TV at the end of your project. When done with your top holes, draw a plum line down to where the second holes should be and draw/drill them out (once more using a level).

With the mount attached to the wall, you now want to attach the television to it. Typically this will involve hanging or hooking the TV on to the mount, then tightening screws on the sides in order to affix it properly.

How to Wall Mount a TV Without Studs
In the event that your walls are older plaster without the benefit of studs (wood or otherwise), you will need to mount your television a little differently. You’re still going to measure and drill your holes using a level as described above, but this time you want to drill about ½” holes that will accommodate snap toggles.

Installing Snap Toggles
While snap toggles come in a variety of sizes and makes, they all function essentially the same way in installation:
- Insert the snap toggle into your drilled hole by bending the metal back towards the plastic, so that it’s closer to horizontal, then pushing it through the hole.
- Pull the plastic back towards you and shift it around until it is clear that the metal is now shifted back to a vertical alignment perpendicular to the plastic.
- Slide the plastic sleeve against the wall in order to tighten the flat metal securely against the back of the wall.
- Snap off the long plastic stem, leaving only the end of the plastic sleeve on the wall as a hole for your mount screws.
- Repeat for all remaining mount holes.
With your snap toggles securely fitted, you will screw your wall mount bolts through the centers of these plastic sleeves. The bolts will secure against the metal T behind the wall. With the mount attached to the wall, you now want to attach the television to it. Typically this will involve hanging or hooking the TV on to the mount, then tightening screws on the sides in order to affix it properly.
Finally, you’re going to want to investigate your TV alignment from the front to ensure that everything is straight. If the TV is crooked but your level shows that the mount itself is attached to the wall straight, there may be an issue with the mount’s arm. Ultimately, what you actually see will matter more than even a finely tuned level can indicate– you are the one watching the television.


